How To Create Custom Navigation Menus in WordPress
Custom Menus is a feature that allows you to customize your WordPress navigation menu. This feature allows you to:
- Change the order of your pages,
- Nest pages so that you can create sub-menus (to create a drop-down list of neighborhoods for example),
- Display posts on multiple pages by creating category pages, and
- You can add posts and custom links to your navigation menu.
Here’s a quick video tutorial that shows you how to use Custom Menus to customize the navigation menu on your WordPress account:
(Click here if you can’t see this video in your feedreader).
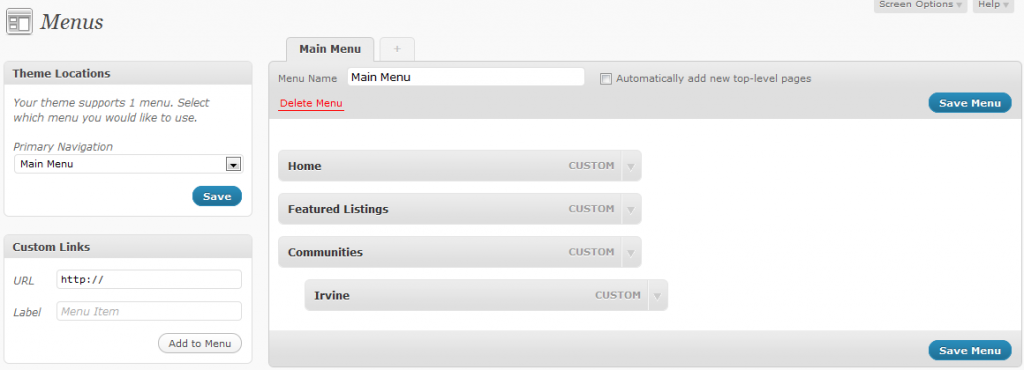
To create a custom menu, go to Appearance (in your WordPress dashboard) > click on “Menus.”

Next, you’ll need to create a Custom Navigation Menu. To do so, type in a name for your new menu in the “Menu Name” field and click “Create Menu.”
Then, select your new menu name from the “primary navigation” drop-down on the left and begin adding custom links to your new navigation menu.
Adding custom menus works especially well in this case if you’re using dsIDXpress on your site. As an example, you might want to link to a “Featured Listings” page that displays the listings associated with your Agent ID. So, you’ll add the following URL to your Custom Links in your WordPress custom menu:
yourblog.com/idx/?idx-q-ListingAgentID=12345
…you’ll title this navigation tab “Featured Listings” and your page will then link to the parameter which displays all of the listings associated with your Agent ID.
Hope that helps, and as always, let us know if you have any questions!

